Acritical By Shubham Sawant
Introduction:
In web development, interacting with databases is a common requirement for managing data. PHP, combined with the power of MySQL, provides a seamless way to create forms that can perform database operations like inserting, updating, and deleting data. In this blog post, we will walk through the process of creating a PHP MySQL form that allows users to manipulate data in a database.
Prerequisites:
To follow along, make sure you have a web server with PHP and MySQL installed. Additionally, basic knowledge of HTML, PHP, and SQL will be helpful.
Setting up the Environment:
Start by creating a new PHP file, for example, `index.php` (File Save Location XAMPP_INSTALLATION_PATH/htdocs/). Inside the file, add the following code:
*To Download this code : Scroll down Download Button Available
<!DOCTYPE html>
<html>
<head>
  <title>PHP MySQL Form By Shubham Sawant</title>
</head>
<body>
  <?php
  // MySQL database connection settings
  $host = 'localhost';
  $username = 'root';
  $password = '';
  $database = 'myDB';
  // Create a connection to the MySQL database
  $connection = mysqli_connect($host, $username, $password, $database);
  if (!$connection) {
    die('Connection error: ' . mysqli_connect_error());
  }
  // Check if the form is submitted for insert, update, or delete
  if (isset($_POST['submit'])) {
    // Insert operation
    if ($_POST['submit'] == 'Insert') {
      $name = $_POST['name'];
      $email = $_POST['email'];
      $query = "INSERT INTO users (name, email) VALUES ('$name', '$email')";
      mysqli_query($connection, $query);
    }
    // Update operation
    if ($_POST['submit'] == 'Update') {
      $id = $_POST['id'];
      $name = $_POST['name'];
      $email = $_POST['email'];
      $query = "UPDATE users SET name='$name', email='$email' WHERE id='$id'";
      mysqli_query($connection, $query);
    }
    // Delete operation
    if ($_POST['submit'] == 'Delete') {
      $id = $_POST['id'];
      $query = "DELETE FROM users WHERE id='$id'";
      mysqli_query($connection, $query);
    }
  }
  ?>
  <h2>User Form</h2>
  <form method="post" action="">
    <label>Id:</label>
    <input type="text" name="id" value=""><br>
    <label>Name:</label>
    <input type="text" name="name" value=""><br>
    <label>Email:</label>
    <input type="email" name="email" value=""><br>
    <input type="submit" name="submit" value="Insert">
    <input type="submit" name="submit" value="Update">
    <input type="submit" name="submit" value="Delete">
  </form>
</body>
</html>
Understanding the Code:
1. The HTML markup provides a form with inputs for the ID, name, and email fields. The form uses the `POST` method to submit the data.
2. Inside the PHP section, we establish a connection to the MySQL database using the provided credentials. Adjust the values of `$host`, `$username`, `$password`, and `$database` according to your setup.
3. We check if the form has been submitted by checking the existence of the `submit` parameter in the `$_POST` array.
4. For each operation (insert, update, delete), we retrieve the form values and construct the corresponding SQL query.
5. The SQL query is executed using `mysqli_query()` with the connection and query as parameters.
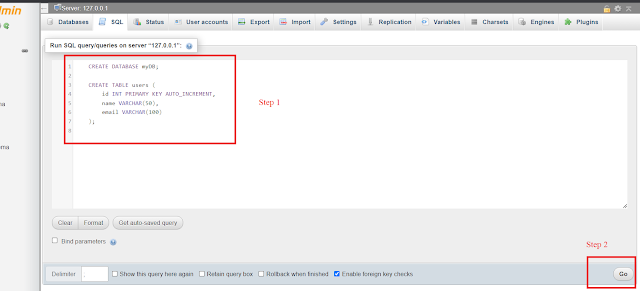
Database Code:
To create Database
CREATE DATABASE myDB;
To Create Table
  	CREATE TABLE users (
    	id INT PRIMARY KEY AUTO_INCREMENT,
        name VARCHAR(50),
        email VARCHAR(100)
    );
Above database query run on XAMPP ( http://localhost/phpmyadmin/index.php?route=/server/sql ) Server before running PHP script.
Conclusion:
In this blog post, we've explored the process of creating a PHP MySQL form for data manipulation. By utilizing PHP's server-side capabilities and MySQL's database management features, we can create dynamic forms that enable users to insert, update, and delete data with ease. Feel free to customize and enhance this code as per your specific requirements. Happy coding!